And an approving nod to other lurkers.
I've been quite efficient in pumping out posts recently, holidays always leave more time to creativity and hobbying than normal day-to-day life. Obviously.
Now, after Christmas, we're heading towards a new year with new tricks up its shady sleeve. How to best prepare for the challenges, triumphs and other twists of fate this towering entity called "2017" lays before us?
By erecting barricades, of course!
These hastily constructed beauties can quickly and cost-efficiently fill your battlefield as archer's stakes, barricades, palisades or earthworks. Most of the factions in Age of Sigmar sometimes erect such obstacles, and although many races could have their own unique palisade designs and ways of erecting them these earth&stake pieces will fill the role nicely in many battles.
It is easy to imagine the Free Peoples or Grots or even Orruks having these protecting their camps/flanks/archers/you-name-it. Slaves to Darkness, Brayherd and Duardin wouldn't have any problems either.
When it comes to Daemons, Seraphon or the Sylvaneth, however, a more unique design would do the job better. The need for Daemons or forestspirits to cut down trees and rummage soil just sounds... questionable.
Anyhow, here's a tutorial on how I made these faction-neutral earthworks from very few materials and some glue. And paint.
Step 1: The Base
What you need:
-Scissors
-Knife
-Wooden Stick
-Glue (PVA, Elmer's... whatever floats your boat)
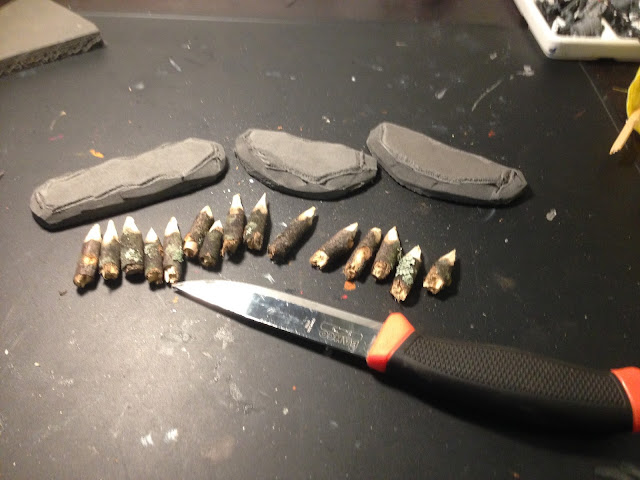
-Foam (the flexible one like in the pic)
-Paints (different browns should do the job)
-Sand (for texturing)
-one or two hours of your life
Cut the foam into pieces of shape and size that please you. Then "round" the edges of the pieces by cutting diagonally, the rougher it looks the better. Save the little chaff that comes off, you'll need it later.
Step 2: The Stakes
Next you'll have to go outside. Yes, the vast roofless space beyond the door of your house with amazing graphics and lots of NPCs. Search for a stick that matches the thickness of the stakes you want to build. I choose ones that are not thicker than my left hand's pinkie, they are nice little tree trunks in 28mm scale.
Oh, and do try to pick a dead stick from the ground. Not only are they easier to shape (being dry and all) but you also avoid the possibility of getting mauled if the living tree you're tearing at turns out to be a Sylvaneth.
Take up your knife and cover your wrists with gromril bracers. Chop or snap the stick into smaller pieces that match the height of your desired stakes, preferably with some variation (mine are anything from 25mm to 40mm in height). Then sharpen one end of each stake with careful chipping using your knife.
Step 3: Putting It Together
Check yourself for any cuts or stabs. No bleeding arteries? No loss of blood? Good.
Take up your glue and knife.
Press a deep "X" mark into the foam with your knife in the spots where you want to place your stakes. Pick up a stake and press it into the X while rotating it gently and it should stick in quite nicely. Then remove the stake, fill the hole with glue and press the stake back. Repeat until every stake has been placed.
An alternative way of doing this is cutting the non-sharpened end of the stake flat, then simply applying glue onto the foampiece and placing the stake there. This method is faster but I prefer the former as it has a more sturdy outcome. Sticking the stakes into the foam is always better than merely gluing them onto the surface, in terms of durability.
Step 4: Decoration
Remember the chaff and leftover pieces of the foam we put aside earlier? Cut them to tiny irregular shapes of various sizes. Go wild with the scissors. If there are more sizable pieces in there then round the edges and use them as rocks or tiles or other heavy things that can be used to brace your earthworks.
Apply glue around the feet of the stakes and stick them full of tiny foam pieces, representing rummaged soil in which the stakes have been dug into. The rocks and tiles we made are perfect for covering up any unnaturally flat surfaces on the foam.
Step 5: Texturing and Painting
Next cover the foam parts in a layer of glue, then sprinkle sand all over it. Alternatively, cover them in Stirland Battlemire -technical Citadel paint. Do not cover parts like rocks, tiles and stones if you wish to paint them differently. Let them dry for a couple of hours, watch a movie with a mate or take a refreshing walk outside.
Then paint them. I started off with Mournfang Brown as a dark undercolour, then drybrushed Balor Brown and Baneblade Brown as lighter colours over it. I aimed for a muddy look in my earthworks but you are free to use a lighter colour as the dominant one if you please, of course.
On the rocks I used Dawnstone as the base colour, then covered them in Nuln Oil wash and finally drybrushed Fenrisian Grey over it.
I didn't paint the stakes themselves at any point. They already look like wooden stakes so why bother?
Here's a showcase of what I've managed to put together using this method:
Now go and make yourself a nice collection of cheap&easy earthworks!
(Tromm = Beard; respect due to age or experience; formal greeting)


